Incident Management
ORNA’s Incident Management feature set follows the SANS Incident Response methodology. It is designed to help the CIRT members, particularly the CIRT Leader, streamline incident response procedures for significant security breaches, minimizing downtime and financial and reputation damage to your organization.
To provide a framework for incident management, ORNA uses highly detailed incident response Playbooks, which contain detailed step-by-step Tasks outlining the actions a given team member should carry out as part of the most efficient and effective response. The goal is to eliminate guesswork regardless of the type or complexity of the attack.
Incident features
ORNA’s incident management includes the following features:
- The list of active and resolved incidents with customizable details and status tracking. The list is searchable and sortable.
- A pie chart showing incident distribution by type.
- A bar chart displaying incident volume by month.
- A global “year” filter affects the incident list, the pie chart, and the bar chart.
- A reel of outstanding tasks assigned to the signed-in user.
- A Trello-type dashboard to efficiently manage the incident resolution process, the team, incident-related evidence, and internal and external communications. Learn more in this guide's Incident Response section.
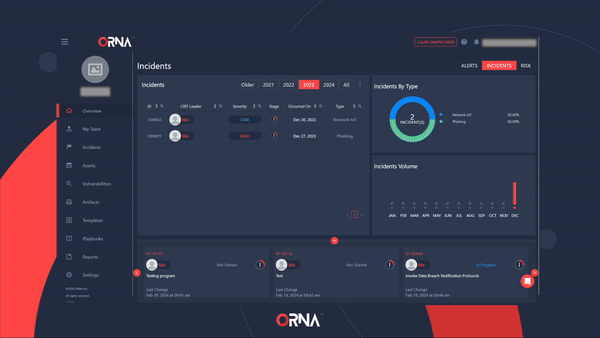
Accessing the Incidents dashboard
There are two ways to view the list of your Incidents:
- Click on the Incidents tab in the top right corner of the Overview dashboard. The dashboard contains various incident-related performance indicators and a list of Incidents.
- Navigate to the Incidents section of the platform directly.
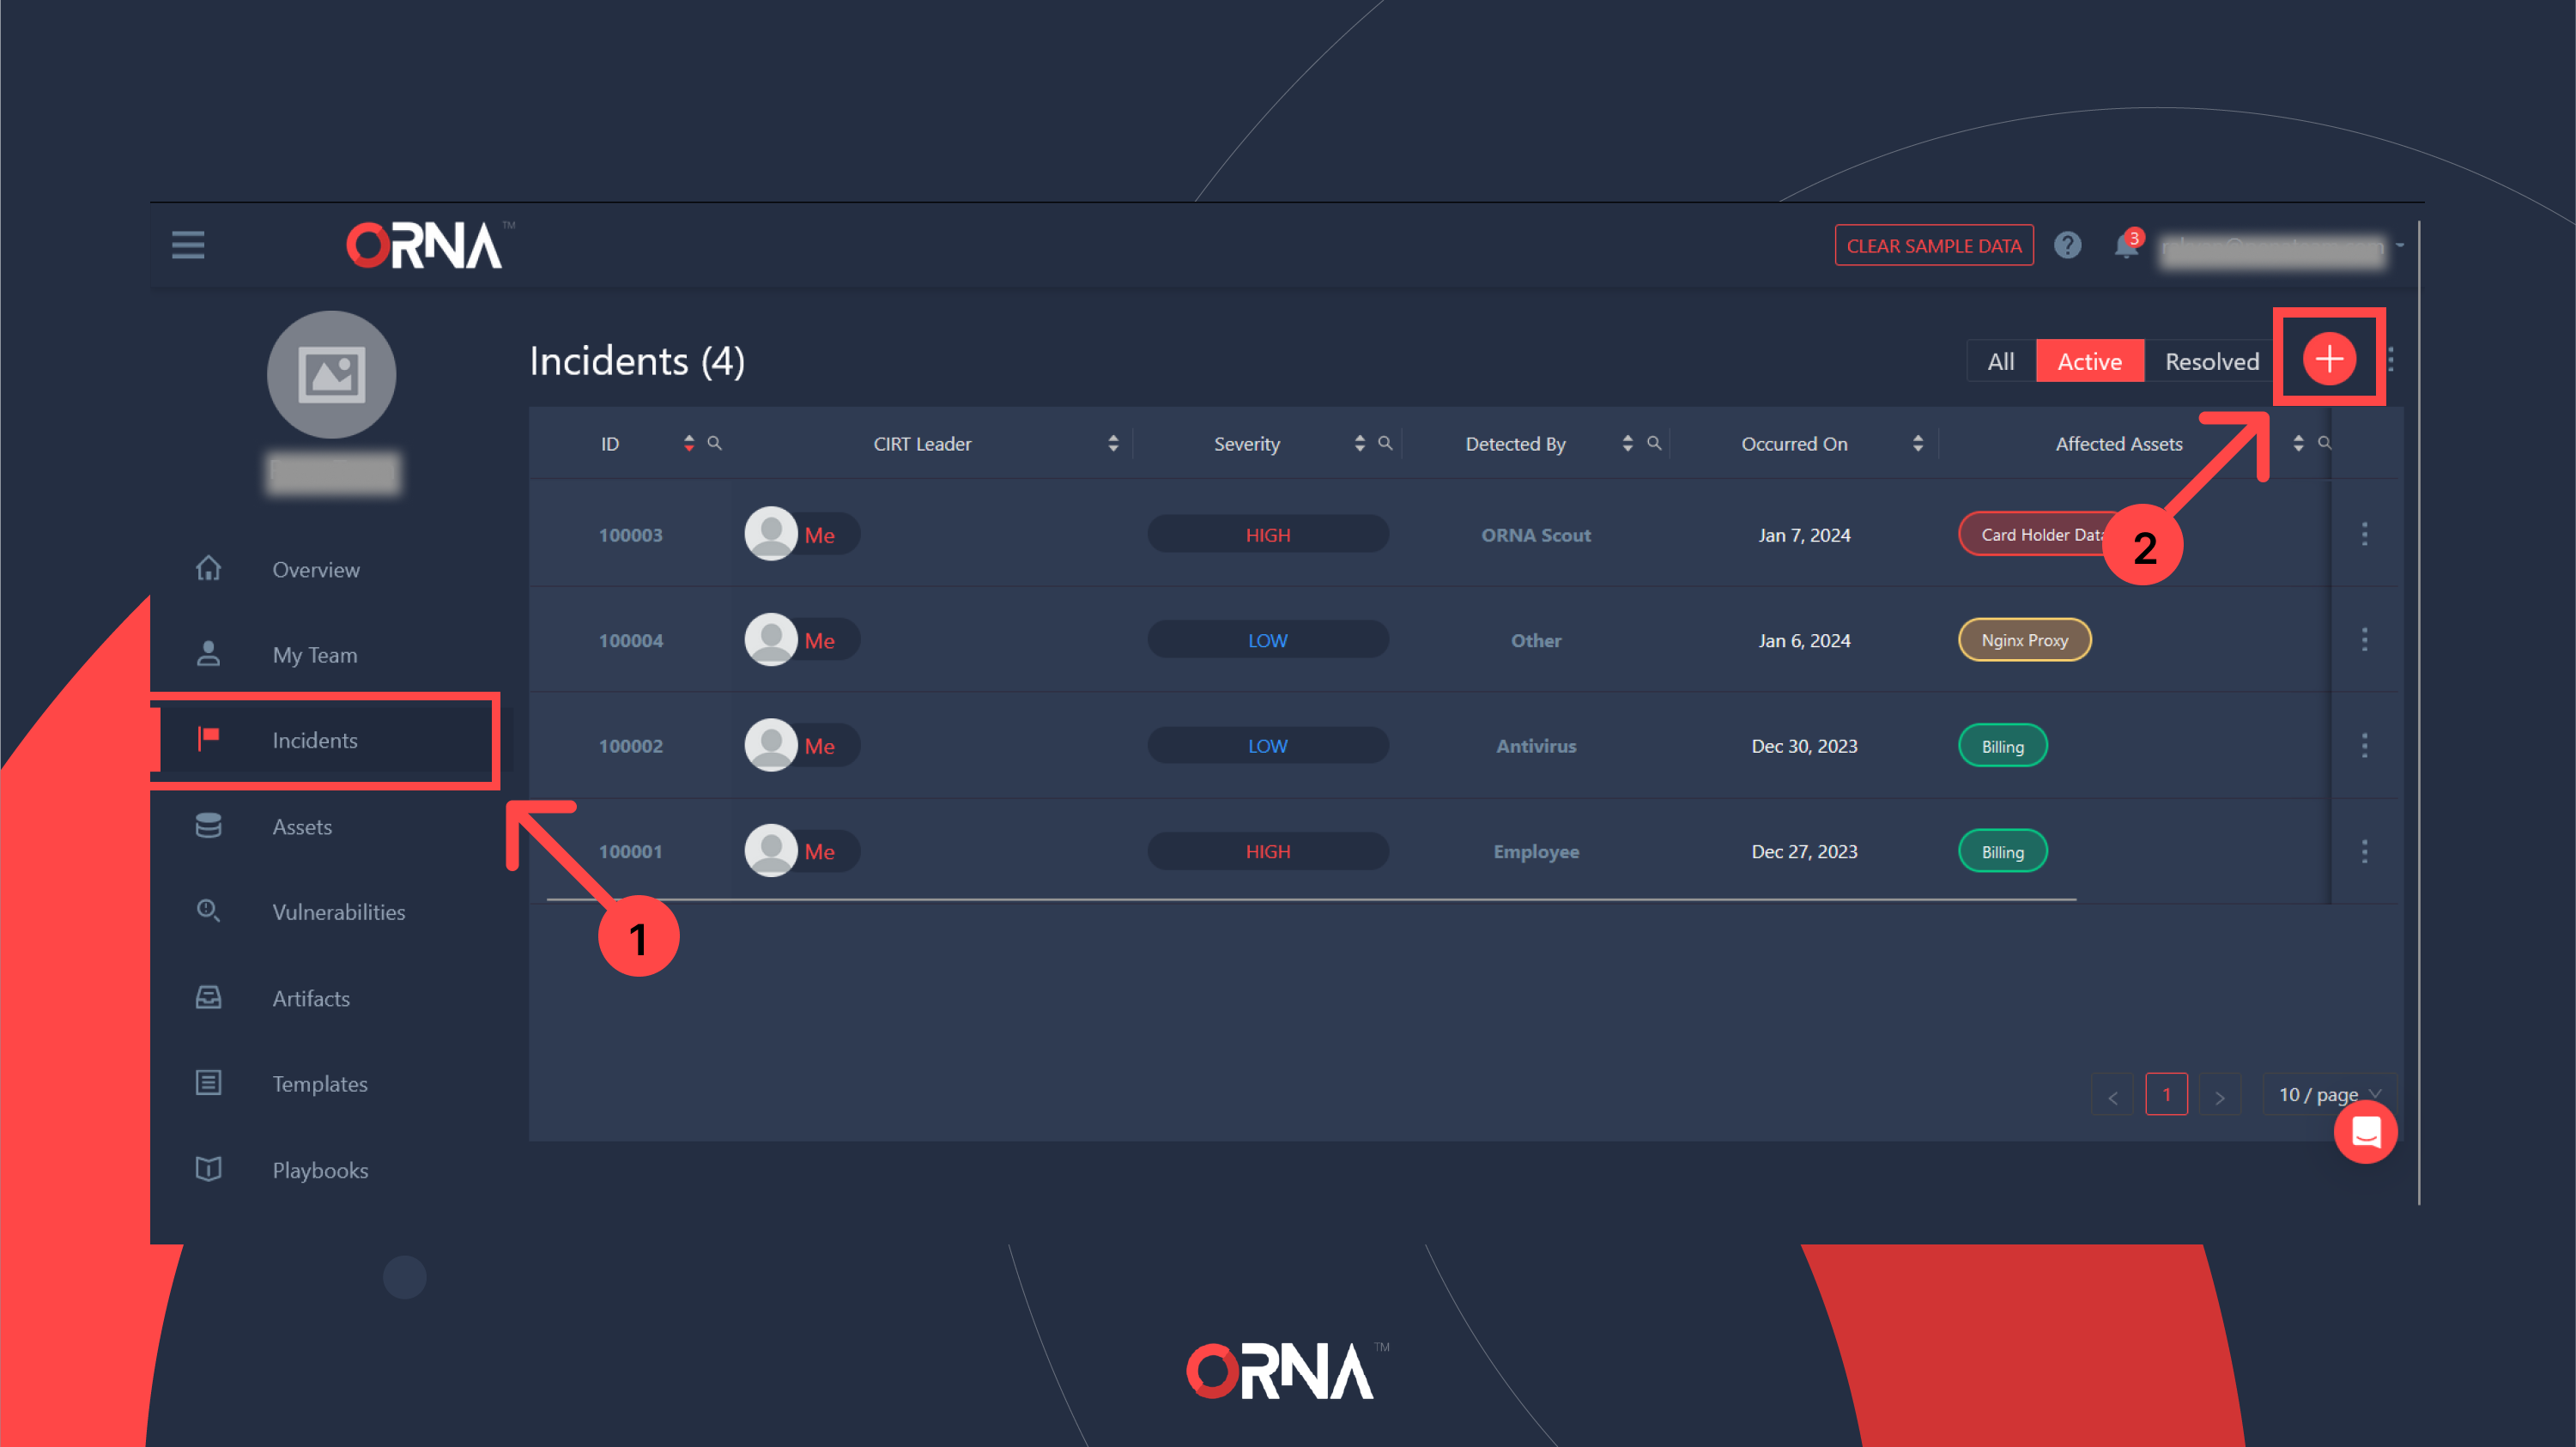
Creating a new Incident
To manually add a new incident, follow the steps below:
NoteThis part describes the manual incident creation process. To learn how to upgrade an Alert to an Incident automatically, browse the Alert Management section of this guide.
- Navigate to the Incidents section using the sidebar menu.
- Click the “+” Add button in the top right corner of the screen.
- Proceed through the guided incident creation process, starting with the Incident Type. This will determine which Playbook will be used to streamline the resolution of this type of incident. Use the “Help Me Determine” button if you aren’t sure.
- Review and finalize the incident details. You can edit most of these later and before the incident is Resolved, except for the Incident Type.
- Click Finalize on the Incident Summary screen to create the Incident.
- This will:
- Invoke the relevant Playbook corresponding to the indicated Incident Type and automatically notify all relevant team members via email or SMS, per their notification preferences;
- Automatically assign all incident resolution Tasks per the Roles assigned to team members.
Manually creating a new Incident
Viewing and editing Incident details
To edit the details of an active incident, follow the steps below:
- Navigate to the Incident Details screen by clicking on an Incident record either in the Overview dashboard or the Incidents section.
NoteYou cannot edit Resolved incidents. To enable editing, you’ll have to reopen this incident using the “...” Options menu in the top right corner of the Incident Details screen.
- Press the Pencil button next to one of the details sections you want to edit. This way, you can manually add or remove affected Assets, edit the Severity rating, and more. Note that you cannot change the Type of an incident after it’s been created.
- Once the desired changes have been made, click the Save button to finalize.
Editing details of an active Incident
Incident Timeline
This feature allows the team, particularly the CIRT Leader (i.e., the incident commander), to track the status of all incident resolution stages, tasks, and the overall progress in real-time.
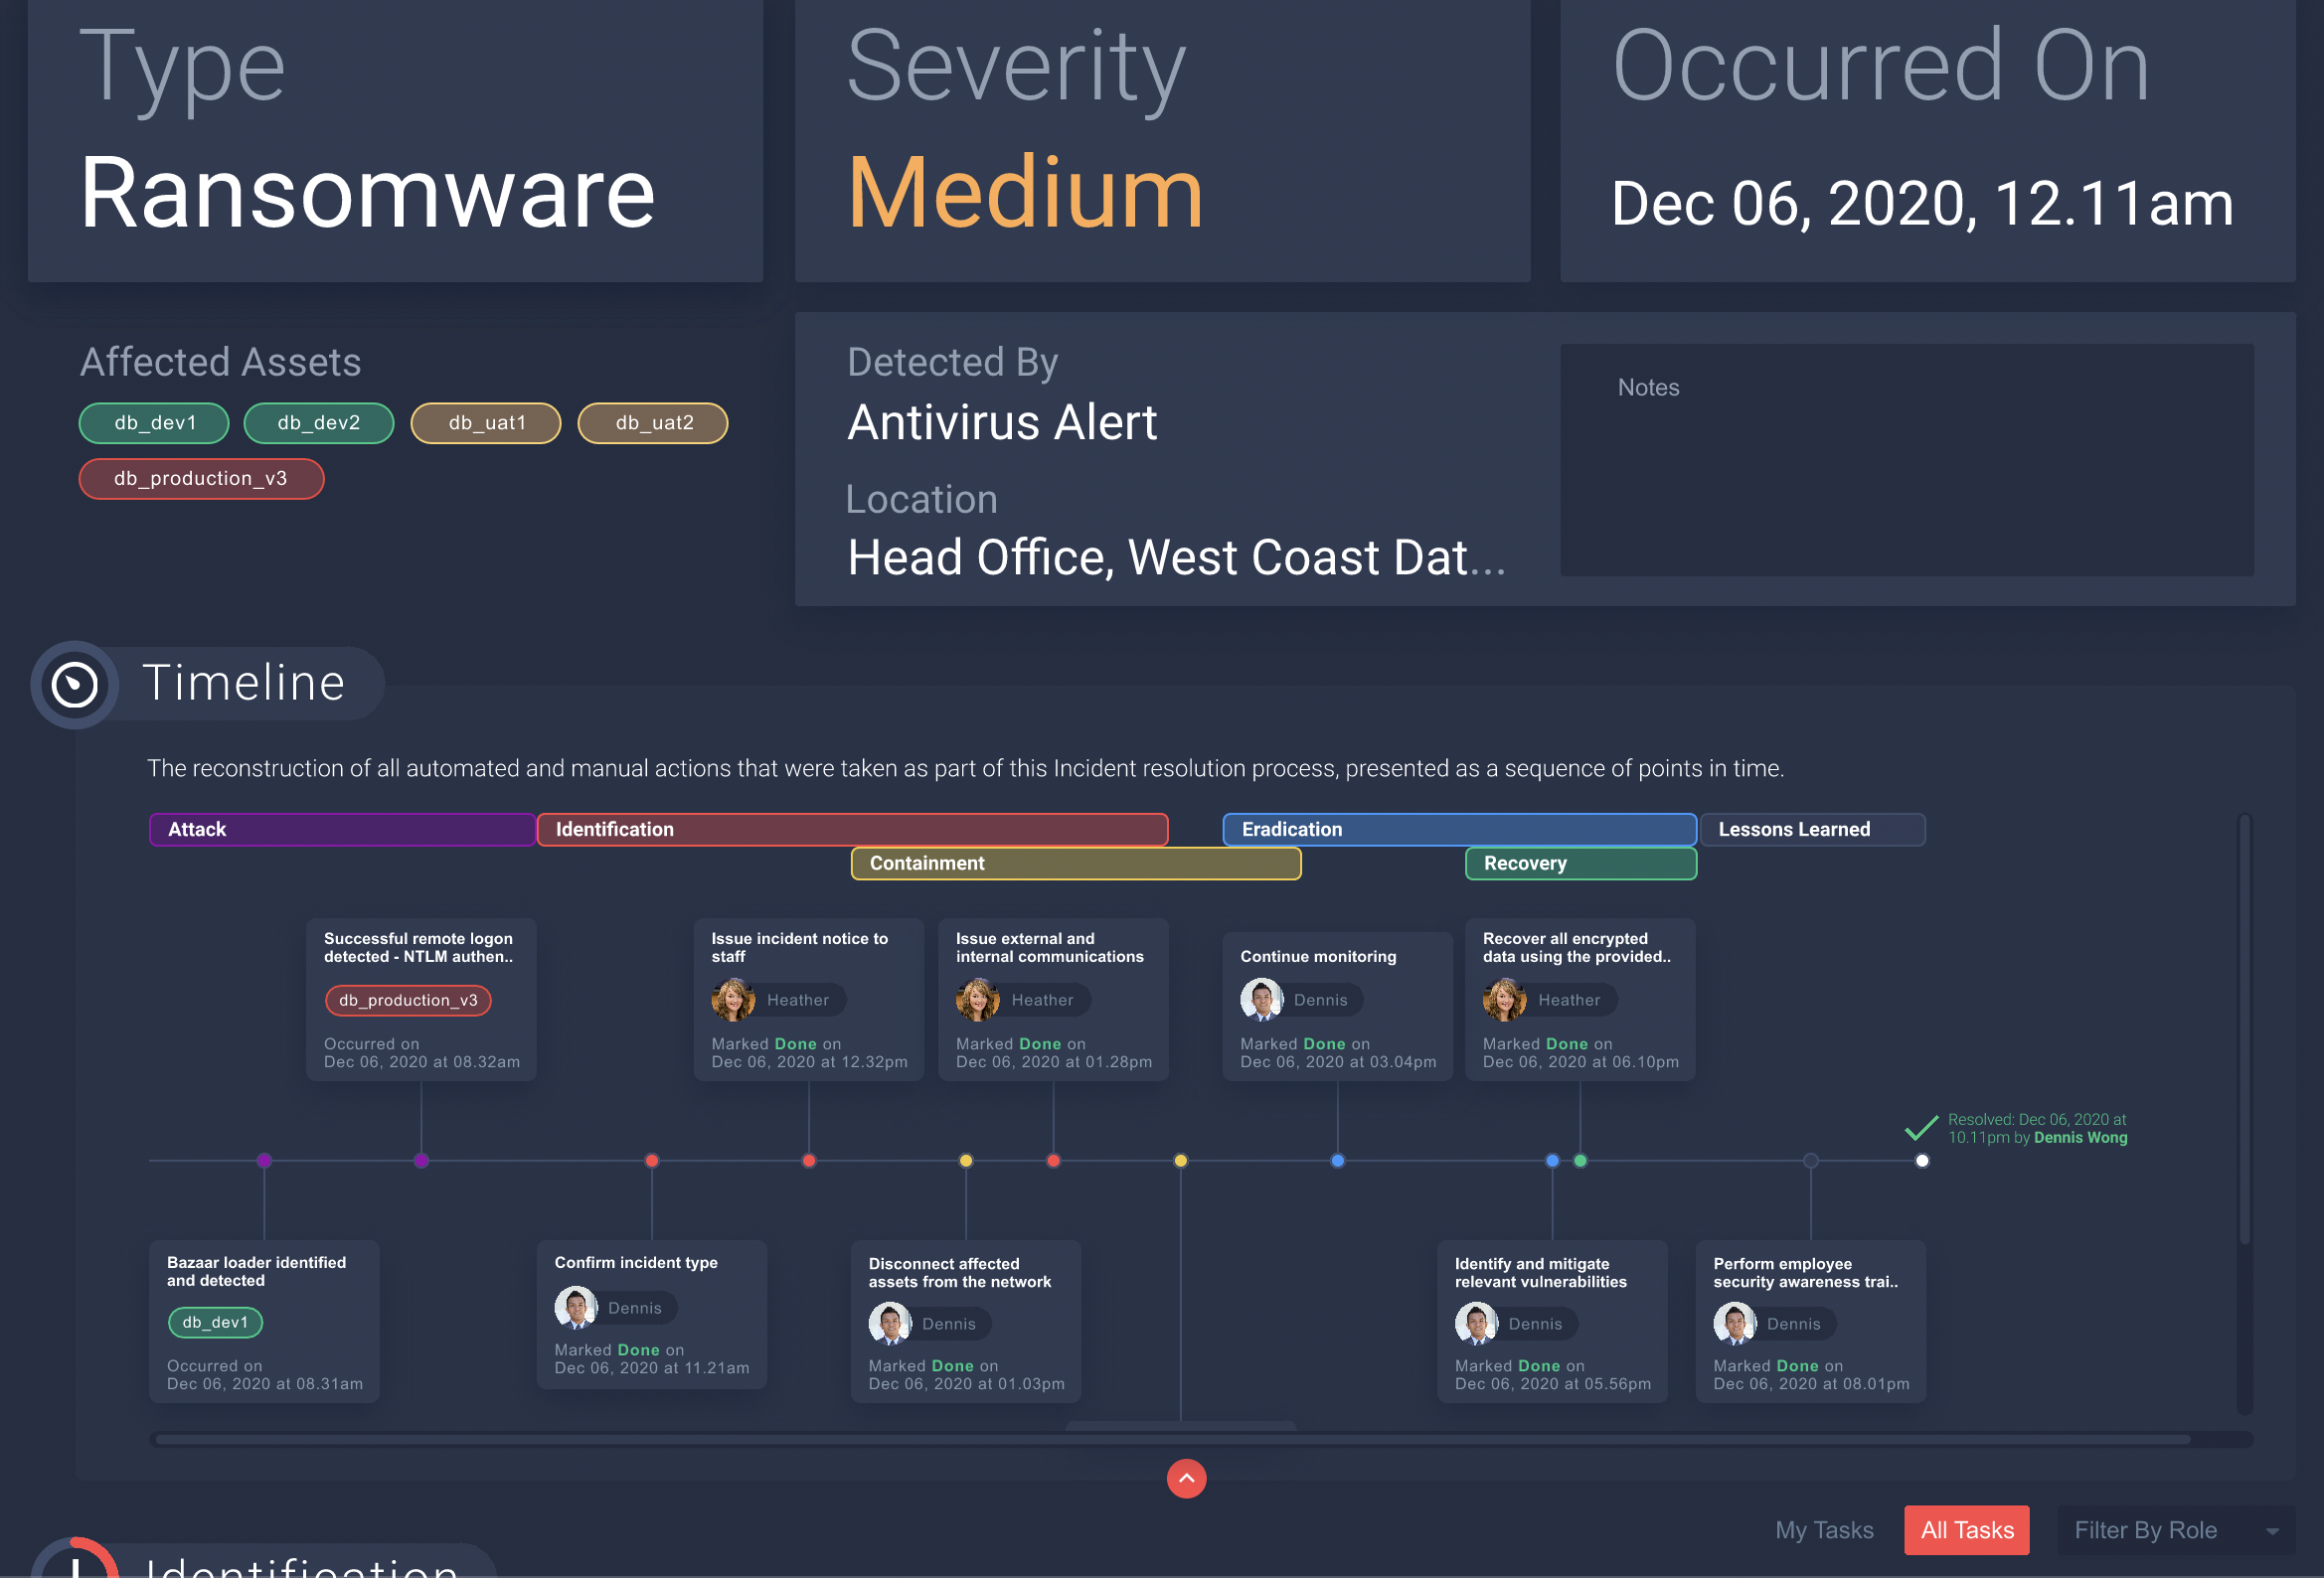
Sample view of the expanded Incident Timeline
You can also use the Timeline to assess and improve your team's efficiency during any given stage, identify workload issues and process bottlenecks, or conduct a post-mortem analysis of your crisis management lifecycle.
Highlights:
- A new Incident Timeline section is now available for all Incidents, and can be found on the Incident Details screen, right above the task management area.
- The Timeline displays tasks with the Done status across all stages of the Incident. Each stage is color-coded consistently with the Task Management area below.
- Any Alerts linked to this Incident will also be included (note: this requires ORNA's Alerts module as part of your subscription) and are represented by the optional Attack stage.
- You can click on any of the Task or Alert cards within the Timeline to view the details of each item.
- You can use your mouse or laptop mousepad to freely navigate the timeline by first clicking on any empty space within the Timeline area.
Resolving Incidents
To resolve an incident, follow the steps below:
- Navigate to the Incident Details screen by clicking on an Incident record either in the Overview dashboard or the Incidents section.
- Option 1: click the “...” Options button in the top right corner of the Incident Details screen and select “Resolve” from the list.
- Option 2: alternatively, navigate to the Incidents section and use the “...” Options button on the right-hand side of the Incident record for the same effect.
- Type “resolve incident” in the confirmation popup, select the desired disposition label (“Ignore” for a false positive, “Resolved” for an actual incident), and click Confirm.
- This Incident will now be marked as Resolved, and you can generate a highly detailed report for it in the Reports section.

Resolving an active Incident (Option 2)
Using Theia AI to help with Task Actions
To get contextual help from Theia regarding a specific task in an active (i.e., non-resolved) incident, follow the steps below:
- Navigate to the Incident Details screen by clicking on an Incident record either in the Overview dashboard or the Incidents section.
- Click on any Task to view its details and specific, step-by-step resolution Actions.
- Within the Task Details, click on one of the available Theia prompts (e.g., “How do I complete this action?” “Why is this action important?”) and select a specific Action you aren’t sure about to receive a user-friendly contextual description from ORNA’s AI engine, Theia. Theia will respond via chat at the bottom of the Task Details screen.
NoteAs a CIRT Leader and admin, you can manage your Tasks and anyone else’s. Non-admin users can only manage their own Tasks.
- To learn more about managing your team and their tasks, browse this guide's Incident Response section.
Viewing Task details in an active Incident
Configuring the Incidents table
To configure the Incidents table per your preferences, follow the steps below:
- Navigate to the Incidents section of the platform.
- Click the “...” Options button on the top right-hand side of the Incidents table and select Configure Table from the list of options.
- Configure the table as desired and close the popup by clicking “X” in the top right corner. As with any other ORNA table, these preferences will only be saved for your account and will not affect other users’ views.

Configuring your individual Incidents table layout
Updated 10 months ago